
Foggy day
[Flutter] Stack Widget - 사용법 본문
이번 포스팅에서는 Stack위젯에 대해 알아보겠습니다.
1. Non-positioned
2. 배치 순서
3. Positioned
4. Positioned.fill
5. 예제
Stack 위젯은 자식 위젯들을 겹치게 배치할 수 있는 위젯입니다.
Stack 위젯에 자식은 Positioned or Non-positioned로 구분할 수 있습니다. Positioned 위젯으로 자식 위젯을 래핑하면 Positioned 상태가 됩니다. Non-positioned는 Positioned 위젯을 사용하지 않은 일반 위젯입니다. Non-positioned인 경우 Stack의 Alignment에 따라서 자식 위치가 결정됩니다. 기본값은 왼쪽에서 오른쪽 환경의 경우 왼쪽 상단 모서리이고, 오른쪽에서 왼쪽 환경의 경우 오른쪽 상단 모서리입니다.
1. Non-positioned
Positioned위젯 없이 Stack위젯을 사용해보겠습니다.
Stack의 자식 위젯으로 Container 한 개를 사용했습니다. Positioned 위젯으로 래핑하지 않았고, alignment값을 설정하지 않았기 때문에 왼쪽 상단에 위치했습니다.

  @override
  Widget build(BuildContext context) {
    return Scaffold(
      appBar: AppBar(
        title: const Text("StackScreen"),
      ),
      body: Stack(
        children: [
          Container(
            width: 100,
            height: 100,
            color: Colors.cyan,
          )
        ],
      ),
    );
  }
2. 배치 순서
스택은 첫 번째 자식이 맨 아래에 위치합니다. 여러 위젯을 겹쳐서 사용하기 위해서는 자식 위젯을 순서를 잘 정해야 합니다. 자식 위젯으로 가로세로 200의 Container가 먼저 왔고, 그다음에 가로세로 150의 Container가 왔습니다. 때문에 렌더링 될 때 작은 사이즈의 150 Container가 더 위에 그려집니다.

  @override
  Widget build(BuildContext context) {
    return Scaffold(
      appBar: AppBar(
        title: const Text("StackScreen"),
      ),
      body: Stack(
        children: [
          Container(
            width: 200,
            height: 200,
            color: Colors.cyan,
          ),
          Container(
            width: 150,
            height: 150,
            color: Colors.pink,
          ),
        ],
      ),
    );
  }
Stack alignment를 설정해 주면 자식 위젯들의 위치를 일괄적으로 변경할 수 있습니다. alignment값을 center로 입력하면 non-positioned인 자식 위젯들이 Stack의 가운데로 이동합니다.
alignment: Alignment.center

  @override
  Widget build(BuildContext context) {
    return Scaffold(
      appBar: AppBar(
        title: const Text("StackScreen"),
      ),
      body: Stack(
        alignment: Alignment.center,
        children: [
          Container(
            width: 200,
            height: 200,
            color: Colors.cyan,
          ),
          Container(
            width: 150,
            height: 150,
            color: Colors.pink,
          ),
          Container(
            width: 100,
            height: 100,
            color: Colors.orange,
          ),
        ],
      ),
    );
  }
3. Positioned
Positioned위젯은 Stack의 자식으로서 위치를 결정하는 데 사용합니다. top, left, right, bottom 4개의 특성이 있습니다. 4개의 값을 모두 입력하지 않거나 null을 입력한다면 Stack의 사이즈는 Positioned의 자식 위젯의 사이즈로 강제됩니다.
2개의 자식 위젯이 있습니다. 하나는 Positioned를 사용했지만 아무 값을 입력하지 않았고, 하나는 top, left를 입력했습니다. 그런데 아무 속성도 입력하지 않은 Positioned 위젯의 자식 사이즈로 Stack 위젯이 강제되었습니다. 때문에 top&left를 150으로 입력하고, 가로 세로를 100으로 입력한 orange컬러의 Container는 조금밖에 보이지 않습니다.

  @override
  Widget build(BuildContext context) {
    return Scaffold(
      appBar: AppBar(
        title: const Text("StackScreen"),
      ),
      backgroundColor: Colors.greenAccent,
      body: positioned(),
    );
  }

  Widget positioned() {
    return Stack(
      children: [
        Positioned(
          child: Container(
            width: 200,
            height: 200,
            color: Colors.blue,
          ),
        ),
        Positioned(
          top: 150,
          left: 150,
          child: Container(
            width: 100,
            height: 100,
            color: Colors.orange,
          ),
        )
      ],
    );
  }
이러한 특성 때문에 때문에 Positioned 위젯에서는 상하 중 한 개, 좌우 중 한 개의 값을 입력하는 것이 필요합니다. 적어도 두 개의 값이 있다면 그것을 기준으로 자식 위젯의 사이즈를 계산해서 화면에 그려줄 수 있기 때문입니다.

  @override
  Widget build(BuildContext context) {
    return Scaffold(
      appBar: AppBar(
        title: const Text("StackScreen"),
      ),
      backgroundColor: Colors.greenAccent,
      body: positioned(),
    );
  }

  Widget positioned() {
    return Stack(
      children: [
        Positioned(
          top: 30,
          left: 30,
          child: _container(170, 170, Colors.purple),
        ),
        Positioned(
          top: 70,
          left: 70,
          child: _container(160, 160, Colors.yellow),
        ),
        Positioned(
          top: 120,
          left: 120,
          child: _container(120, 120, Colors.orange),
        ),
        Positioned(
          top: 170,
          left: 170,
          child: _container(80, 80, Colors.red),
        ),
      ],
    );
  }

  Widget _container(double width, double height, Color color) {
    return Container(
      width: width,
      height: height,
      decoration: BoxDecoration(
        boxShadow: [
          BoxShadow(
              color: color.withOpacity(0.5),
              offset: const Offset(0, 3),
              blurRadius: 10,
              spreadRadius: 8)
        ],
        color: color,
      ),
    );
  }
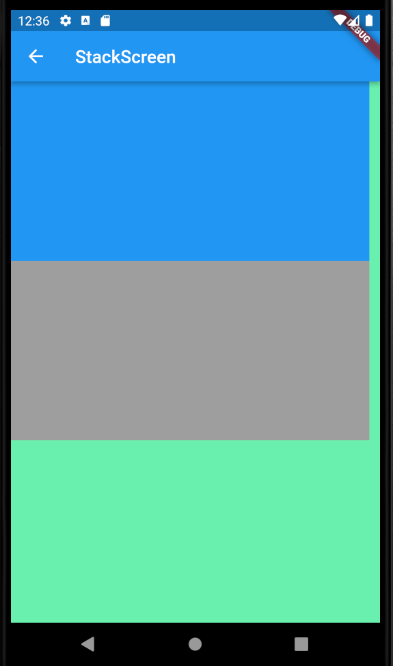
4. Positioned.fill
그럼 만약에 Positioned 자식 위젯의 사이즈를 입력하고 left, right를 0으로 입력하면 어떻게 될까요?
자식 위젯의 가로 사이즈는 무시되고, Stack의 사이즈만큼 확장됩니다.
가로 세로 200의 컨테이너를 Positioned로 래핑하고 left 0, right 0을 입력했더니 Stack의 상위 Container의 가로 사이즈인 400으로 가로 사이즈가 강제됐습니다.
  Widget positionedFill() {
    return Container(
      width: 400,
      height: 400,
      color: Colors.grey,
      child: Stack(
        children: [
          Positioned(
            left: 0,
            right: 0,
            child: Container(
              width: 200,
              height: 200,
              color: Colors.blue,
            ),
          ),
        ],
      ),
    );
  }
만약 상하좌우를 모두 0으로 입력하면 자식 위젯의 사이즈는 모두 무시되고, 확장 가능한 크기로 확장됩니다. 그리고 상하좌우를 모두 0으로 입력하는 것이 기본값으로 세팅된 위젯이 Positioned.fill 위젯입니다.

Widget positionedFill() {
  return Container(
    width: 400,
    height: 400,
    color: Colors.grey,
    child: Stack(
      children: [
        Positioned.fill(
          child: Container(
            width: 200,
            height: 200,
            color: Colors.blue,
          ),
        ),
      ],
    ),
  );
}
5. 예제
Stack, Container, transform을 사용해서 만든 예제입니다.

  Widget _stackPyramid() {
    return Center(
      child: Transform.scale(
        scale: 0.8,
        child: Transform.rotate(
          angle: (45 * pi) / 180,
          child: Stack(
            children: [
              _container(320, 320, Colors.purple),
              _container(280, 280, Colors.indigo),
              _container(240, 240, Colors.blue),
              _container(200, 200, Colors.green),
              _container(160, 160, Colors.yellow),
              _container(120, 120, Colors.orange),
              _container(80, 80, Colors.red),
            ],
          ),
        ),
      ),
    );
  }

  Widget _container(double width, double height, Color color) {
    return Container(
      width: width,
      height: height,
      decoration: BoxDecoration(
        boxShadow: [
          BoxShadow(
              color: color.withOpacity(0.5),
              offset: const Offset(0, 3),
              blurRadius: 10,
              spreadRadius: 8)
        ],
        color: color,
      ),
    );
}'Flutter > Flutter widget' 카테고리의 다른 글
| [Flutter] TabBar Widget - 사용법 (4) | 2023.03.26 |
|---|---|
| [Flutter] Button Widget - 예제(ElevatedButton, TextButton, OutlinedButton, IconButton) (0) | 2023.03.26 |
| [Flutter] How Flutter renders Widgets? - Flutter가 위젯을 그리는 방법 (0) | 2023.03.24 |
| [Flutter] GridView - 사용법 (0) | 2023.03.24 |
| [Flutter] ListView - 사용법 (2) | 2023.03.23 |


